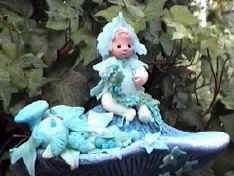
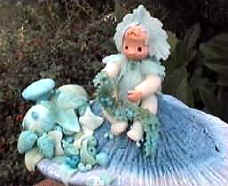
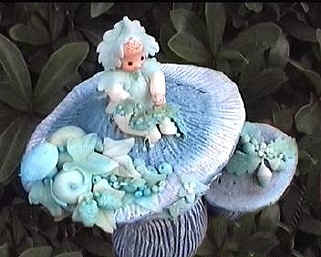
October Baby
" Sanne"
|
October Baby " Sanne"
|
|
Attention: wash your hands before you start working! |
Materials needed:
|
|
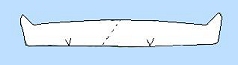
Paint the mushroom wit white acrylic paint and let dry. Brush the lower part of the mushroom. Use a hard brush, dip it in the blue paint and wipe of most of the ink on a piece of kitchen paper. Brush the lower part horizontaly. Only paint the middle of the cap (upper part of the mushroom) blue.
|
|
|
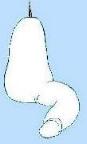
The body
Make a 1" cone out of aluminum foil. Cover the cone with white clay. Pierce the topside with a needle and push the toothpick in here.
|
|
|
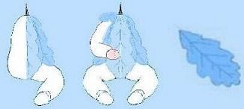
Legs
Make a 2" by 1/2" long worm from the white clay and cut this in half for the two legs. Make two incisions in the hollow of the knees. Bent the legs into shape and fasten them to the body. Glue the body on top of the mushroom.
|
|
|
The dress The dress is made from five leave. (see picture). Mix white clay with just a little drop of blue ink. You can marble or mix the ink all through the clay. Flatten the colored clay and cut out the leaves with your knife. If you draw the leave on cardboard and cut this out, you have a pattern to make leaves.
|
|
|
Arms and hands
Make a two " long worm from white clay ( a less thick then 1/2"). Cut this in half through the center. Pierce a hole for the hands in each arm. Make the hands and fasten them in the holes. Make two incisions into the elbows, bend the arms into shape and fasten them to the body. Lay a little leaf on each shoulder (see picture)
|
|
|
Head and cap of little leaves
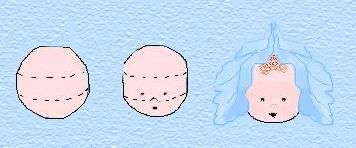
Make a small ball, a lit less then 1" in diameter for the head. Press in and make a groove from ear to ear with the wooden part of the clay shaper. Make sure the head stays round. Press a tiny ball on the bottom part of the groove for the nose. The nose will be finished after you poked two holes into it with a toothpick. For the eyes you use two little beads.
The mouth is in the middle of the nose and the chin. Push the top of a toothpick on the right place in the clay, pull out and lift the upper lip a bit. Also pull out a bit of clay for the under lip. You don't have to make ears! Make a hole in the bottom of the head with a needle and carefully place the head (turning back and forward) on the toothpick in the body Give Sanne a cap made of little leaves and don't forget to make her some curly hair!
|
|
|
Other embellishments: Bake the baby for 20 minutes at 265 in the oven. Once it has cooled, color the cheeks with some blush.
|
|
|
|
Enjoy and have fun with this workshop! Jacqueline van Hesse-Penning (Pennydolls) October, 2001 Text and Illustrations |
|